
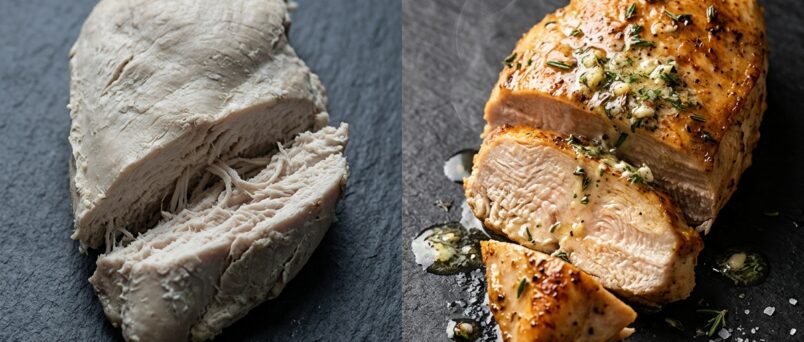
You pull the chicken out of the oven, let it rest, slice into it, and watch the juices fail to run. The meat is pale, tight, and chalky. The recipe said 45 minutes, so you cooked it 45 minutes — but the recipe doesn’t know how thick your chicken breast is or how accurate your oven’s thermostat really is. That gap between a recipe’s timer and your actual food is why so many home cooks struggle with dry chicken. The pros don’t rely on time at all; they rely on temperature. If you’ve ever wondered how do you use a food thermometer //greatestjournal.com/food-and-fruits/how-to-use-meat-thermometer-correctly-for-perfect-cooking/ to get consistently juicy results, that single habit is the difference between guesswork and control.
Quick Answer
Insert a food thermometer into the thickest part of the chicken, avoiding bone, fat, and gristle. For chicken breast, pull it at 160°F (71°C) and let it rest — carryover cooking brings it to 165°F (74°C). For thighs and legs, cook to 175°F (79°C) for the best texture. The thermometer removes the guesswork that causes dry meat: you stop cooking the moment the meat is safe and done, not when a timer says so.
Key Takeaways
- Dry chicken is almost always overcooked chicken. The fix is measuring internal temperature, not shortening cook time.
- Different cuts finish at different temperatures: breast is best pulled at 160°F and rested; thighs benefit from 175°F for tenderness.
- Carryover cooking adds roughly 5°F after the chicken leaves the heat, so pull slightly below your target.
- Thermometer placement matters more than the thermometer itself — the thickest part, away from bone and fat.
- Resting for 5–10 minutes lets juices redistribute instead of running out onto the cutting board.
Why Chicken Breasts Go Dry So Easily
Chicken breast is a lean cut with very little fat and connective tissue to keep it moist. That means it has a narrow window between “safely cooked” and “dry.” The USDA recommends a minimum internal temperature of 165°F (74°C) for all poultry, but the moment chicken breast passes that point, the muscle fibers continue to contract and squeeze out moisture.
Thighs and legs behave differently. They contain more fat and collagen, so they tolerate higher temperatures — and actually improve with them. Cooking thighs to 175°F or even 185°F breaks down collagen into gelatin, giving that silky texture you get from slow-cooked chicken. Cooking breast to those temperatures produces shoe leather.
This is why “cook chicken to 165°F” is only half the story. The right target depends on the cut, and the only way to know where you are is to measure.
How to Use a Food Thermometer Correctly
The mechanics are simple, but small mistakes cause big errors. Follow these steps each time you check chicken.
- Choose the right spot. Insert the probe into the thickest part of the meat, usually the center of the breast or the deepest part of the thigh. Avoid touching bone, which heats faster and gives a false high reading.
- Go deep enough. The sensing tip needs to sit in the center of the meat, not near the surface. For thin cutlets, insert from the side so the probe reaches the middle.
- Wait for the reading to stabilize. Digital instant-read thermometers typically settle in 2–5 seconds. Don’t pull it out the moment the numbers start moving.
- Check more than one spot. Chicken pieces vary in thickness. If you’re cooking multiple breasts, check the thickest one in the center of the pan, not the edge pieces.
- Pull early when appropriate. Because of carryover cooking, pulling breast at 160°F and letting it rest usually lands it right around 165°F.
- Clean the probe between checks. A quick wipe with hot soapy water or an alcohol wipe prevents cross-contamination, especially when checking different pieces.
These steps apply whether you’re using a basic instant-read thermometer or a leave-in probe thermometer. Leave-in models are especially useful for whole roasted chicken since you can monitor without opening the oven repeatedly.
The Temperature Targets That Actually Matter
Here’s a reference you can use the next time you cook chicken. Notice that the “pull” temperature is lower than the final target because of carryover cooking.
| Cut | Pull from heat at | Final rested temperature | Notes |
|---|---|---|---|
| Chicken breast | 160°F (71°C) | 165°F (74°C) | Rest 5–10 minutes; slice against the grain |
| Chicken thigh | 170–175°F (77–79°C) | 175°F (79°C) | Higher temp improves texture |
| Chicken wings | 175°F (79°C) | 175°F (79°C) | Skin crisps better at higher temps |
| Whole roasted chicken | 155–160°F (68–71°C) in breast | 165°F (74°C) in breast | Check both breast and thigh |
| Ground chicken | 160°F (71°C) | 165°F (74°C) | USDA recommends 165°F for ground poultry |
The USDA minimum for poultry is 165°F (74°C) measured in the thickest part. The pull temperatures above are practical guidelines that account for carryover; if you prefer to be strictly conservative, cook until the thermometer reads 165°F in the meat itself and skip the carryover shortcut.
Why Carryover Cooking Changes Everything
When you remove chicken from the heat, the outside is hotter than the inside. That heat keeps transferring inward, raising the internal temperature by roughly 5°F during the first few minutes of resting. This is carryover cooking, and it’s the reason professionals pull meat slightly below the target.
For a chicken breast, the difference between pulling at 160°F and pulling at 165°F is small on paper but noticeable on the plate. At 160°F, carryover nudges it to a safe 165°F while the fibers are still relaxed. At 165°F pull, carryover pushes it toward 170°F, and the meat tightens. The result is a slightly drier breast — not ruined, but not as juicy as it could be.
Carryover is most pronounced in large roasts and whole birds because there’s more mass to hold heat. For thin cutlets or skewers, the effect is smaller. Always rest the meat on a cutting board or plate, loosely tented with foil, for 5–10 minutes before slicing.
Common Mistakes That Lead to Dry Chicken
Even cooks who own a thermometer sometimes end up with dry results. These are the recurring culprits.
- Guessing by color or time. Pinkness and juice clarity are unreliable indicators. Time depends on thickness, starting temperature, and pan heat.
- Checking too early and too often. Every time you open the oven or pierce the meat, you lose heat and moisture. Wait until you’re near the expected finish time.
- Probing the bone. Bone conducts heat faster than meat, so a reading near bone can be 10–15°F too high.
- Skipping the rest. Cutting immediately releases juices onto the board instead of letting them redistribute through the meat.
- Using a dial thermometer without calibrating. Many inexpensive dial thermometers are off by 10°F or more. Check yours in ice water (32°F) and boiling water (212°F at sea level) periodically.
- Cooking cold chicken straight from the fridge. Letting chicken sit at room temperature for 15–20 minutes before cooking helps it heat more evenly, reducing the risk of a dry exterior and undercooked center.
Thermometer Types: Which One Fits Your Cooking?
You don’t need a drawer full of gadgets. One accurate thermometer covers almost everything. Here’s how the main types compare.
| Type | Best for | Response time | Limitations |
|---|---|---|---|
| Instant-read digital | Quick checks on cutlets, breasts, thighs | 2–5 seconds | Not for leaving in the oven |
| Leave-in probe | Whole roasts, long cooks | Continuous | Probe and cable need oven-safe rating |
| Dial (analog) | Budget option, occasional use | 15–30 seconds | Can drift out of calibration |
| Infrared | Surface temps, pan heat | Instant | Cannot measure internal meat temperature |
For most home cooks, an instant-read digital thermometer is the most practical starting point. If you roast whole chickens regularly, a leave-in probe with an oven-safe cable is a worthwhile upgrade.
A Practical Example: Pan-Seared Chicken Breast
Imagine two chicken breasts, each about an inch thick, seared in a hot pan. You cook them for 6 minutes per side based on a recipe. Without a thermometer, you have no idea whether the centers hit 150°F or 180°F.
Now try the same cook with a thermometer. After 5 minutes per side, you insert the probe into the thickest part of one breast and read 145°F. You give it another 2 minutes, check again, and read 158°F. You pull both breasts, rest them 5 minutes, and slice. The interior is just past 165°F, juicy, and safe.
The difference isn’t a secret technique or a special pan. It’s information — and that information comes from the thermometer. The same principle applies whether you’re grilling, roasting, pan-searing, or poaching.
Frequently Asked Questions
Can I cook chicken to 160°F instead of 165°F?
The USDA recommends 165°F (74°C) for poultry safety. However, pasteurization is a function of both temperature and time. Chicken held at 160°F for about 30 seconds reaches the same level of safety as chicken instantly heated to 165°F. Many chefs pull breast at 160°F and rely on carryover cooking to finish the job. If you prefer strict adherence, cook until the thermometer reads 165°F in the meat.
Where exactly should I insert the thermometer?
Insert the probe into the thickest part of the meat, avoiding bone, fat, and gristle. For a whole chicken, check both the breast (thickest part) and the thigh (without touching the bone). For thin cutlets or wings, insert from the side so the tip reaches the center.
How long should chicken rest before cutting?
Rest chicken breast and thighs for 5–10 minutes. A whole roasted chicken benefits from 10–15 minutes. Resting allows carryover cooking to finish the meat and lets juices redistribute so they stay in the meat instead of running onto the board.
Do I need a different thermometer for the oven?
Instant-read thermometers are not designed to stay in the oven. If you want continuous monitoring during roasting, use a leave-in probe thermometer with an oven-safe cable. Otherwise, use an instant-read thermometer and check the meat quickly, closing the oven door between checks.
Why is my chicken still dry even when I hit 165°F?
If you’re measuring accurately and still getting dry chicken, the likely issues are overcooking past 165°F due to carryover, cutting immediately without resting, or cooking a lean cut like breast to a temperature better suited for thighs. Try pulling breast at 160°F, resting 5 minutes, and slicing against the grain.
Is it safe to eat chicken with a slightly pink center?
Color is not a reliable indicator of doneness. Chicken can appear pink near the bone even when fully cooked, and it can look white while still undercooked. Always rely on internal temperature, not color, to determine safety. If the thickest part reads 165°F after resting, it’s safe.
Conclusion
Dry chicken isn’t a mystery — it’s a measurement problem. Recipes give you time, but your oven, your pan, and your chicken don’t read recipes. They respond to heat, and the only way to know where you are is to measure the internal temperature. Pull breast at 160°F and rest it, cook thighs to 175°F, and always check the thickest part away from the bone. Once you make the thermometer a habit, you stop guessing and start getting juicy chicken every time.